How to Balance Noise and Sharpness in Images, The right way?
This Blog covers all-encompassing concepts required for a complete understanding of Noise and Sharpness in your Photographs, including an explanation of how noise is generated in an Image. Why is Balancing Noise and Sharpness important? & How to Balance Noise and Sharpness in the Right Way in both Photoshop and Lightroom.
Rohan Joshi
Published at: Aug 1, 2022 5:53 PM
Co-Author: Navanshu Rastogi
Image Noise in Photography is always an issue. While working in extreme situations where the amount of light is lower than required for perfect exposure and the time to capture the moment is limited. In such conditions, Noise is bound to be part of your creation.
If you are a Photographer who loves Creating and Editing Low Light Images, this article is the best place to clear your concepts about Digital Noise in your visuals. Understanding the source of the issue is the only way in which you will be able to handle noise like a professional and come up with a workflow that suits best according to your shooting style and how your device fits in the entire process. So let's begin.
Let us Investigate this matter.
See the process of capturing an image. We can easily see the two points where the quality and details in an image can be compromised.
- While the information is collected by the sensor.
- While signals from the sensor are processed and are stored in the Storage unit i.e. Memory card.
Let's see both the points and identify the issues.
The image creation process at its core is based on a beautiful scientific process, known as the Photoelectric Effect Founded by Albert Einstein.
Light contains photons. Photons are tiny particles that carry energy.
When a person starts exposing the sensor of the camera to take the image, the light or photons enters through the lenses of the camera, pass by the open shutter and hits the sensor of the camera, Sensors use the photoelectric effect to convert photons into an electric signal. The sensor starts absorbing the energy from these photons, then it generates a potential difference(voltage). This change in voltage generates the signals. Signals from each pixel make up an image.
The efficiency by which the information from the subject is gathered by the array of pixels present on the sensor is crucial for the recorded image quality.
Senor is an array of small buckets called pixels that have capacity and size. Each pixel has a specific size in which it can store the incoming information from the photons. How wide the range of information the pixels on the sensor can store when exposed is called the dynamic range of that sensor.
Thus, Sensor Size is not directly related to the dynamic range but Pixel Size directly affects the dynamic range of the sensor.
We just defined a sensor as an array of buckets called pixels. We are calling pixels, a bucket to explain how a basic pixel in a sensor works and the noise associated with each pixel. Let's look at the pixel bucket analogy to go a bit deeper into the concepts.
Imagine a pixel as a bucket. A bucket can hold the incoming photons.
The capacity of the pixel bucket is defined by the depth of the bucket, while accuracy is by its opening size.
Next is Sensor, which is an array of these pixel buckets.
The effective capacity of the entire sensor depends on the capacity of the Individual Pixel. The thing to note is, that a bigger sensor has better pixel capacity in most cases but there can be a scenario where the sensor is small but has higher capacity pixels and may perform better than large sensors.
But the core idea of the pixel bucket is Fixed.
Last is megapixels, Megapixels is the total number of pixels on a sensor.
Imagine photons randomly falling on two Pixel buckets
You need to pick one of the two sensors for the following case.
CASE 1 - If the Capacity of pixels on both Sensors is Same.
Sensor A now has more accurate Images in terms of colours, but Sensor B will produce an Image of Higher Resolution. The choice, in this case, will depend on the end use case of the photographer.
CASE 2 - If Sensor A pixels capacity is greater than Sensor B.
In this case, Sensor A has a better Dynamic Range when compared to Sensor B. B's total pixels are effectively less. Now making such a choice is up to the photographer and his needs. A Low-light photographer might be in favour of Choosing A over B. Meanwhile, a Portrait photographer with the liberty of using flashes might pick Sensor B over Sensor A.
CASE 3 - If Sensor A pixel capacity is less than Sensor B.
In this case, this concludes that Sensor A has a less dynamic range. Also, the Megapixel count is less on A. Thus going with B is the best choice.
Note: Exposure time, illumination and sensor size are constant for all cases.
Everything is composed of tiny atoms. Atoms have electrons that revolve around their nucleus in orbit.
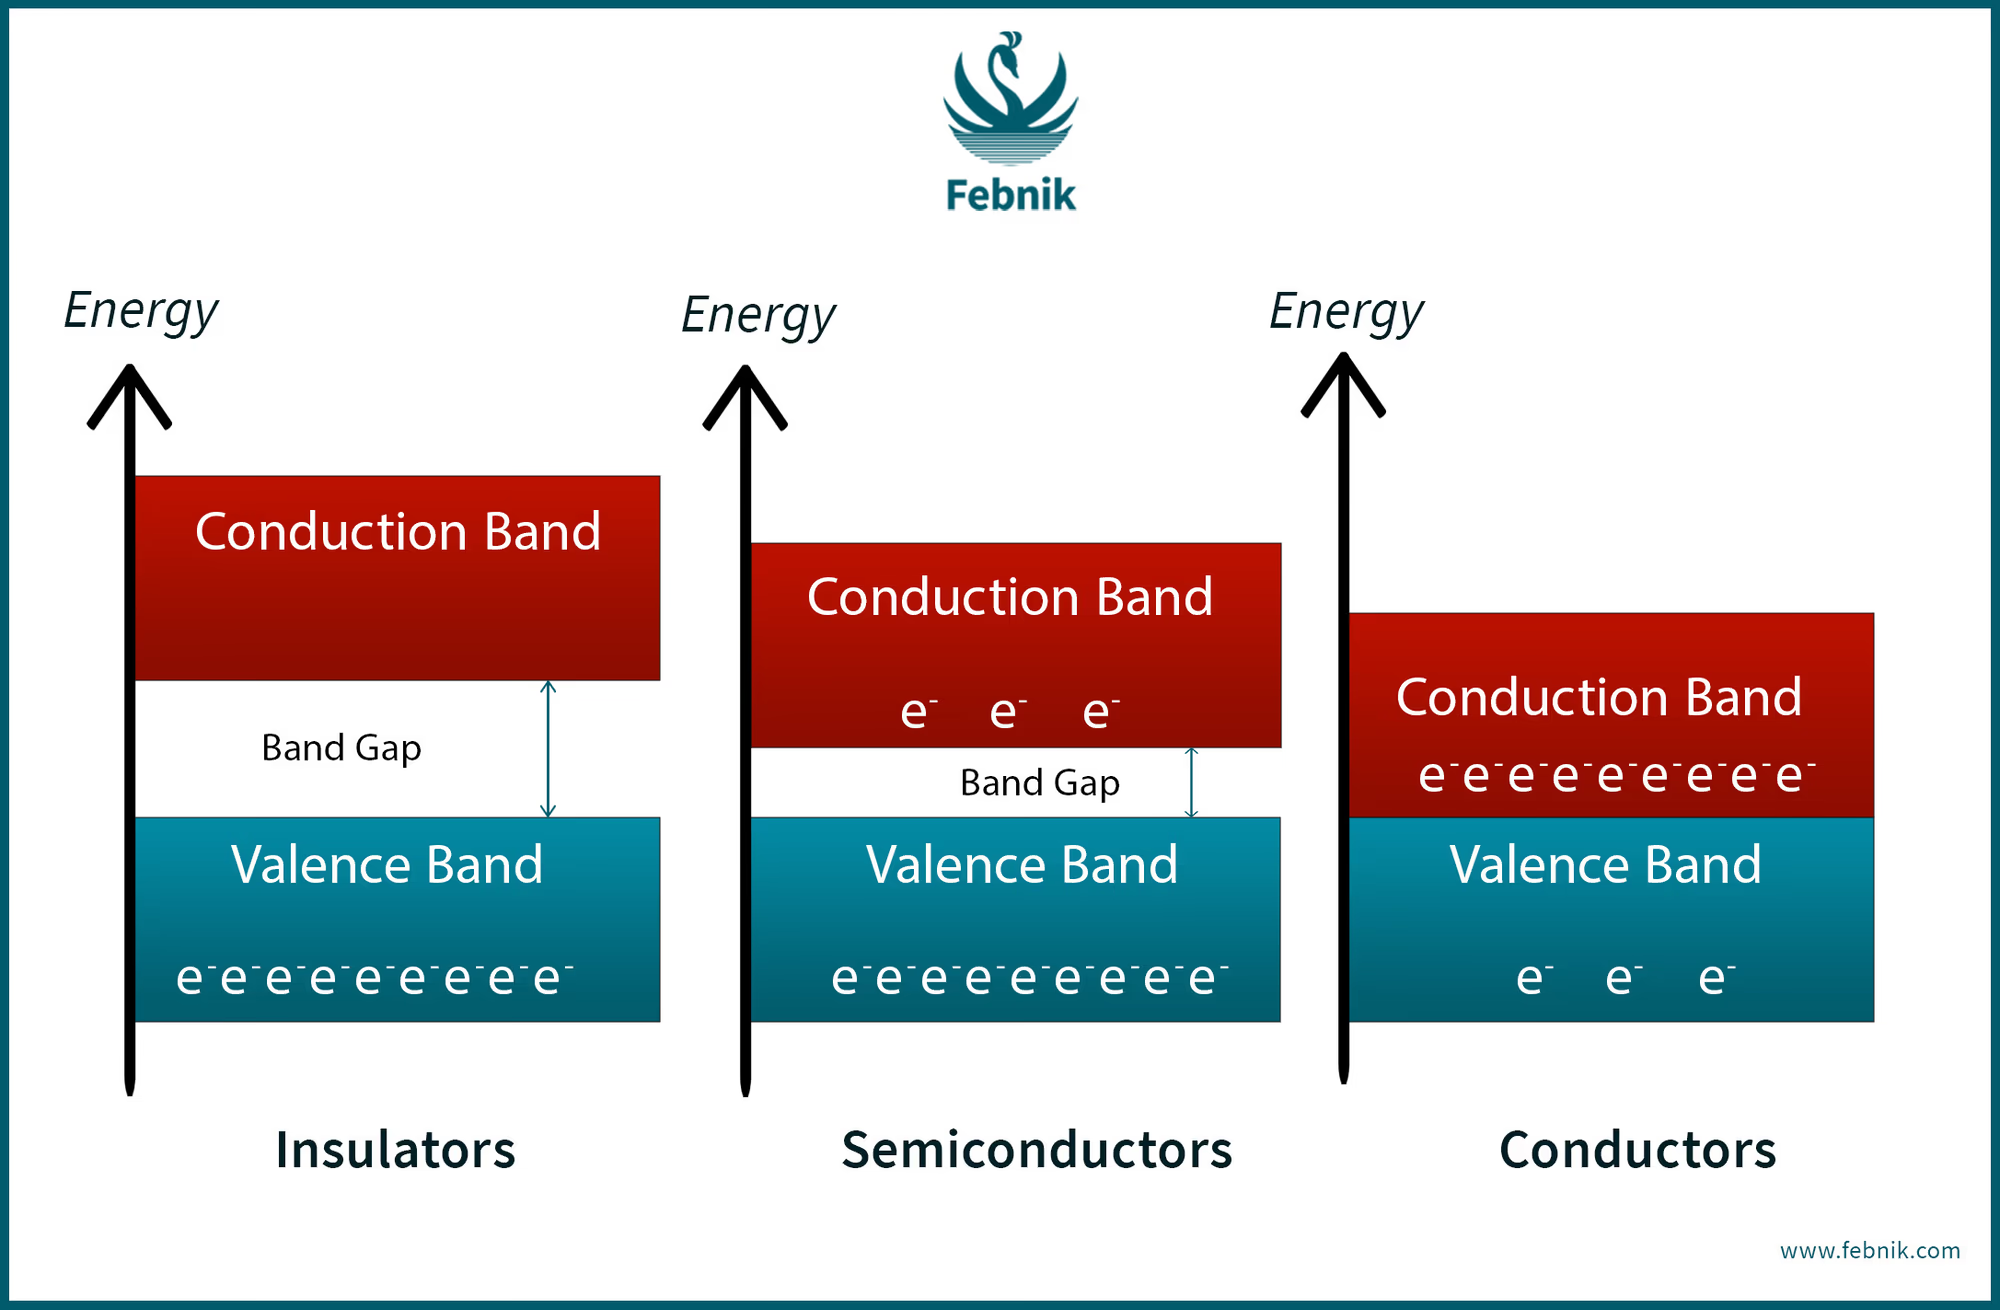
When electrons gain energy, they start jumping from one atom to another and move to a higher orbit called the Conduction Band from their Valence Band, producing Electric Current.
The energy difference between the two orbits, Valence Band and Conduction Band, is called Band Gap.
Each material has a different band gap, measured in Electron Volts.
See the diagram below.
Insulators have a high band gap, so they resist the current flow.
Semiconductors have a small band gap close to 0.6 – 1.5 eV.
Conductor valence and conduction bands may overlap, so there is no longer a bandgap.
To overcome this band gap in Photodiodes or Sensors which are made using semiconductors, they use the energy of Light or Photons falling on them to push electrons from the Valence to the Conduction band. Depending on how these solar cells are made, we can control the size of this band gap. The camera works using this principle to convert light into Image.
In a Photodiode or Sensor, when Electrons move to Conduction Band they can freely jump from atom to atom. The atoms become positively charged when an electron leaves them and start attracting other electrons this causes Electric Current to Flow.
Quantum Efficiency is used to define the efficiency of a photodiode or Sensor. It is measured by the number of Photons fell on it and the amount of Charge it produces.
A better Quantum Efficiency contributes to better sensitivity.
Photographic films have a quantum efficiency of around 10%, while Photodiodes can have an efficiency of up to 90%. Poor quantum efficiency results in poor low light performance meanwhile a higher quantum efficiency can make the device perform better in low light situations.
Voltage fluctuations in the camera that contribute to unwanted signals and inaccuracy in the Image Data are Image Noise. From the moment the Shutter of the Camera opens, the image is destined to have some noise in it.
During the process of capturing and storing the image, several noise sources hamper the details of the image. Let's see and understand them.
Shot Noise
In Photography, shot noise is fluctuations in the number of photons detected by a sensor due to their occurrence independent of each other. All Pixels on the Sensor receive a different number of photons at a given time. This created a difference in Signals known as Shot Noise. It is because of the nature of photos that are emitted randomly.
Read Noise
The incoming photons are converted to a voltage. These analogue signals then pass through a chain of Analog to Digital Converters. Any voltage fluctuations in the signal processing chain that contribute to a deviation of analogue to digital units from the ideal value proportional to the photon count, is called read noise.
Gaussian Noise
The camera sensor has inherent noise due to the level of illumination and its temperature, and the electronic circuits connected to the sensor inject their share of electronic circuit noise. Factors like the temperature at the shooting location and heat generated by prolonged use contribute to the heating up of the sensor as well. This makes up Gaussian Noise.
Signal Noise Ratio is defined as the ratio of signals received to the standard deviations of these signals.
According to ISO film speed sensitivity standards, an SNR value of 40:1 is "excellent" image quality. SNR value of 10:1 for "acceptable" image quality.
Camera Manufacturers make Imaging Devices to get the best SNR in the toughest conditions while keeping the product Segment and cost in mind.
Manufacturers regulate the price and quality by keeping a cheek on :
- Quality and Size of Silicon Used in Sensors and Electronics.
- Electronic Circuit and it's technology for signal processing during analog to digital conversion.
- Image processing Algorithms on Software Level.
Sharpness is a crucial component of Images. Every person who has researched a bit about purchasing a camera or mobile for Photography knows the importance of Sharpness. Good sharpness helps us in easily identify details in an Image. Often people understand that the higher the number of pixels better is the sharpness, thanks to marketers. Sharpness is not only dependent on megapixels but it depends on multiple factors. Let's explore them.
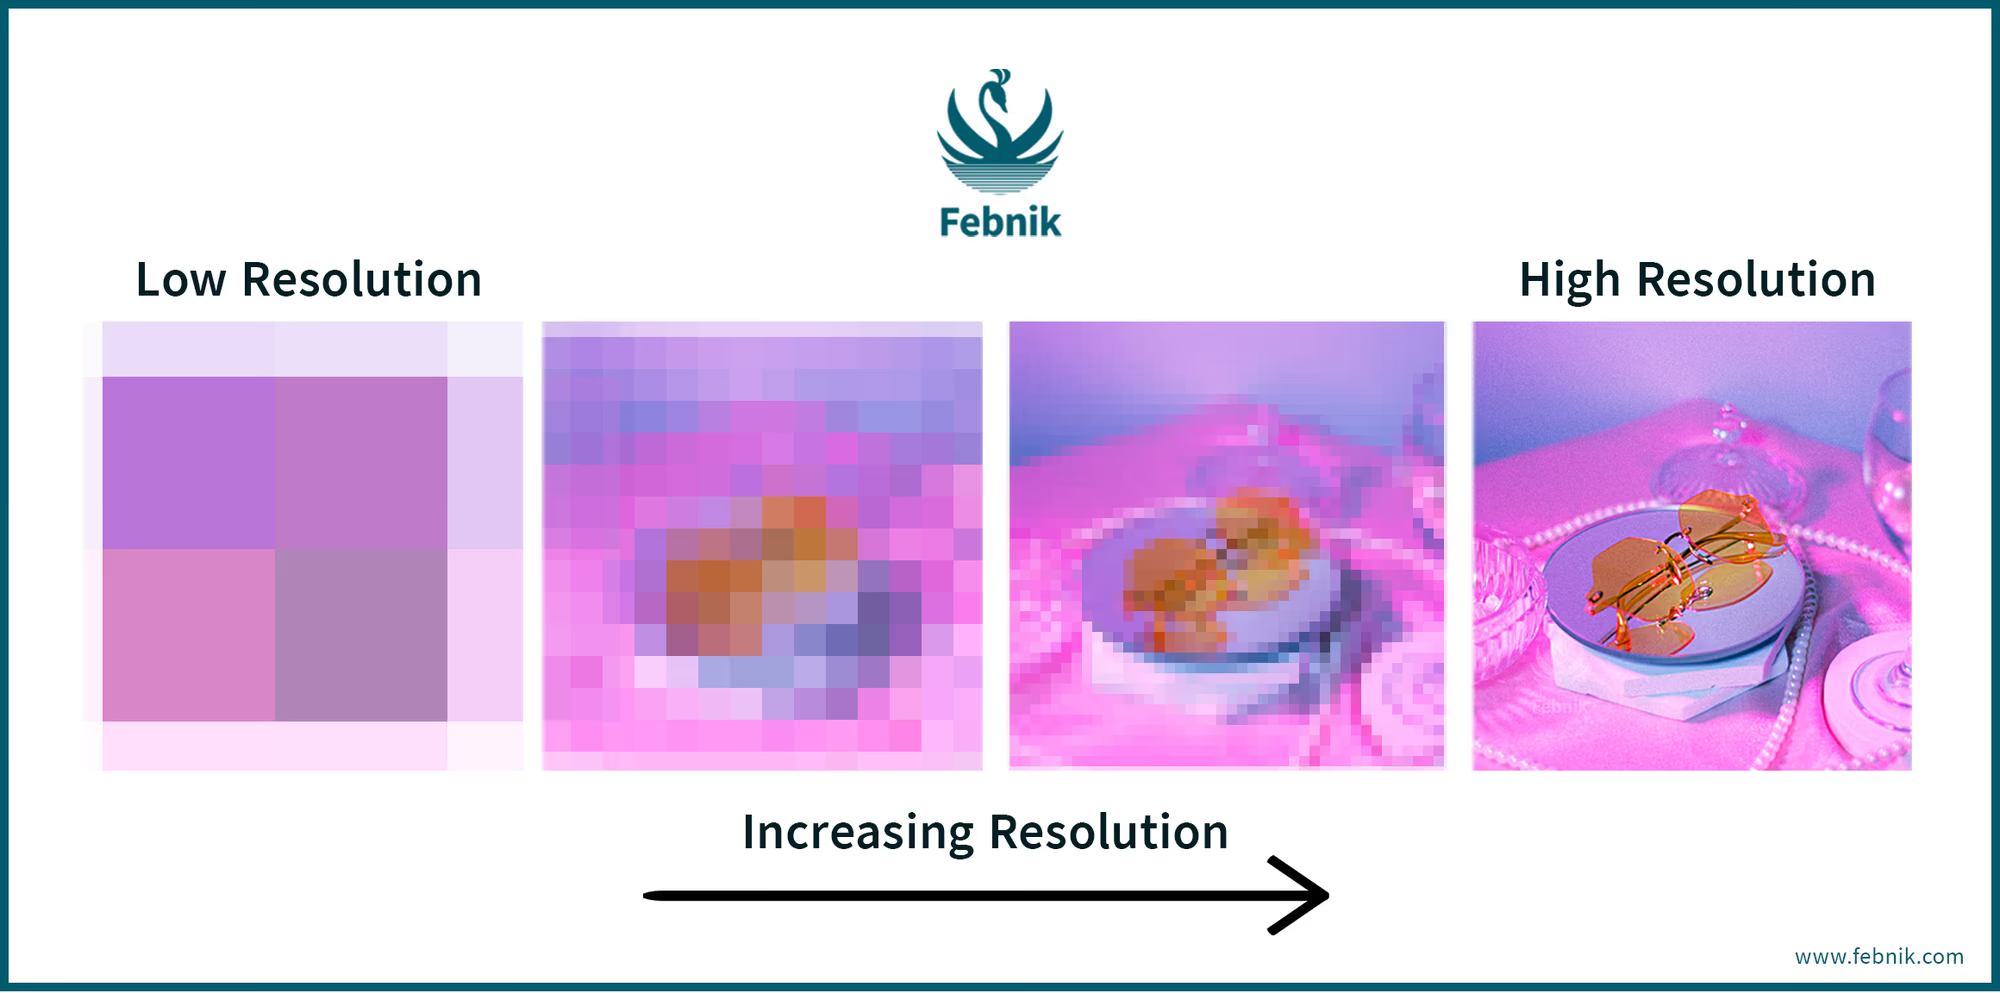
Resolution is how close lines can be to each other and still be visible clearly. This resolution can be measured in units like lines/mm. In digital cameras, we have multiple types of resolutions. Like Pixel Count of Mega Pixels, Spatial Resolution, Temporal Resolution etc. Look at the diagram below, the low resolution makes the image poor both in terms of colours and sharpness. A higher megapixel is important because it helps in accurately depicting an image.
Acutance is how distinctly an Edge is Visible in an Image. Acutance doesn't depend on how precise the edge is but on the luminosity or brightness difference on the sides of the edge. See the Image below in the diagram above the luminosity difference is gradual hence there is no clear edge. In the second diagram, the edge has a very sharp luminosity difference. The sharper the difference the more the acutance in the image.
After an image is created acutance is used to artificially Enhance the Sharpness of the Image. Artificial Actuance results in the formation of two halos around the line one are bright and the other is dark.
You must have understood that when an Image is Created it has a defined amount of Noise and Sharpness. Noise that deteriorates the image and Sharpness that can enhance the image. When an image is sharpened all the Image Data is affected including Details and Noise. When we increase the amount of Noise in an image it overpowers small details making everything inaccurate but sharper.
This relationship is unfortunate for Photographers because when we remove noise from an Image it loses its sharpness. Maintaining sharpness while reducing Noise requires an accurate understanding of your device and your shooting environment which we have provided above to finally develop your own method to overcome this hurdle. An outcome of this relationship is that both Noise and Sharpness controls are together in the Details tab in Lightroom. This shows that the Lightroom team understands that you need to work on these two together.
Now we will see two methods to achieve the best one for Lightroom users and one for Photoshop users.
- Open Lightroom > Import Images > Goto Develop Tab > Do basic adjustments > Once clear about the Colours > Details
- In the details tab, there are two options
- Sharpening
- Noise Reduction
- It's important to keep Subject Sharp while reducing the Raw Image Development Phase. First, crop the image in the size and ratio at which it will be finally viewed. Then Zoom in to somewhere 200 to 300%. Then start adjusting the sharpening Section till every detail is clear. While doing so keep checking the noise introduced while moving the slider to the right.
- Next is the important phase of Noise Reduction. While sharpening images, we often introduce some level of noise in the colour and luminance of the Subject. Also, images shot in high iso and low light conditions often have digital noise. We usually use Noise Reduction to deal with such issues in the Image Development phase.
- Using Noise Reduction is a quick simple trick in dealing with jewellery having fine scratches. It removes the minor Colour and Luminosity Disturbances caused on the surface of the subject because of scratches which in most cases reduces the Photoshop Post Processing time of removing dust and scratches.
- You must balance the amount of Sharpening and Noise reduction for best results. Move the Noise Reduction slider to the right to reduce the noise in your photo. Keep your adjustment subtle. The noise reduction process smooths pixels, and it can remove fine detail. The goal is never to remove noise completely. Instead, focus on reducing noise caused due to scratches on the surface.
- Open Photoshop > Load the Image > Duplicate your Image and Make it a Smart Object. Now our base is ready, we will start working.
- The noise reduction algorithm of Photoshop is a novice compared to Lightroom. If you apply Noise Reduction Directly in Photoshop the results will never be good. The colours of Shadows will be overpowered by Noise.
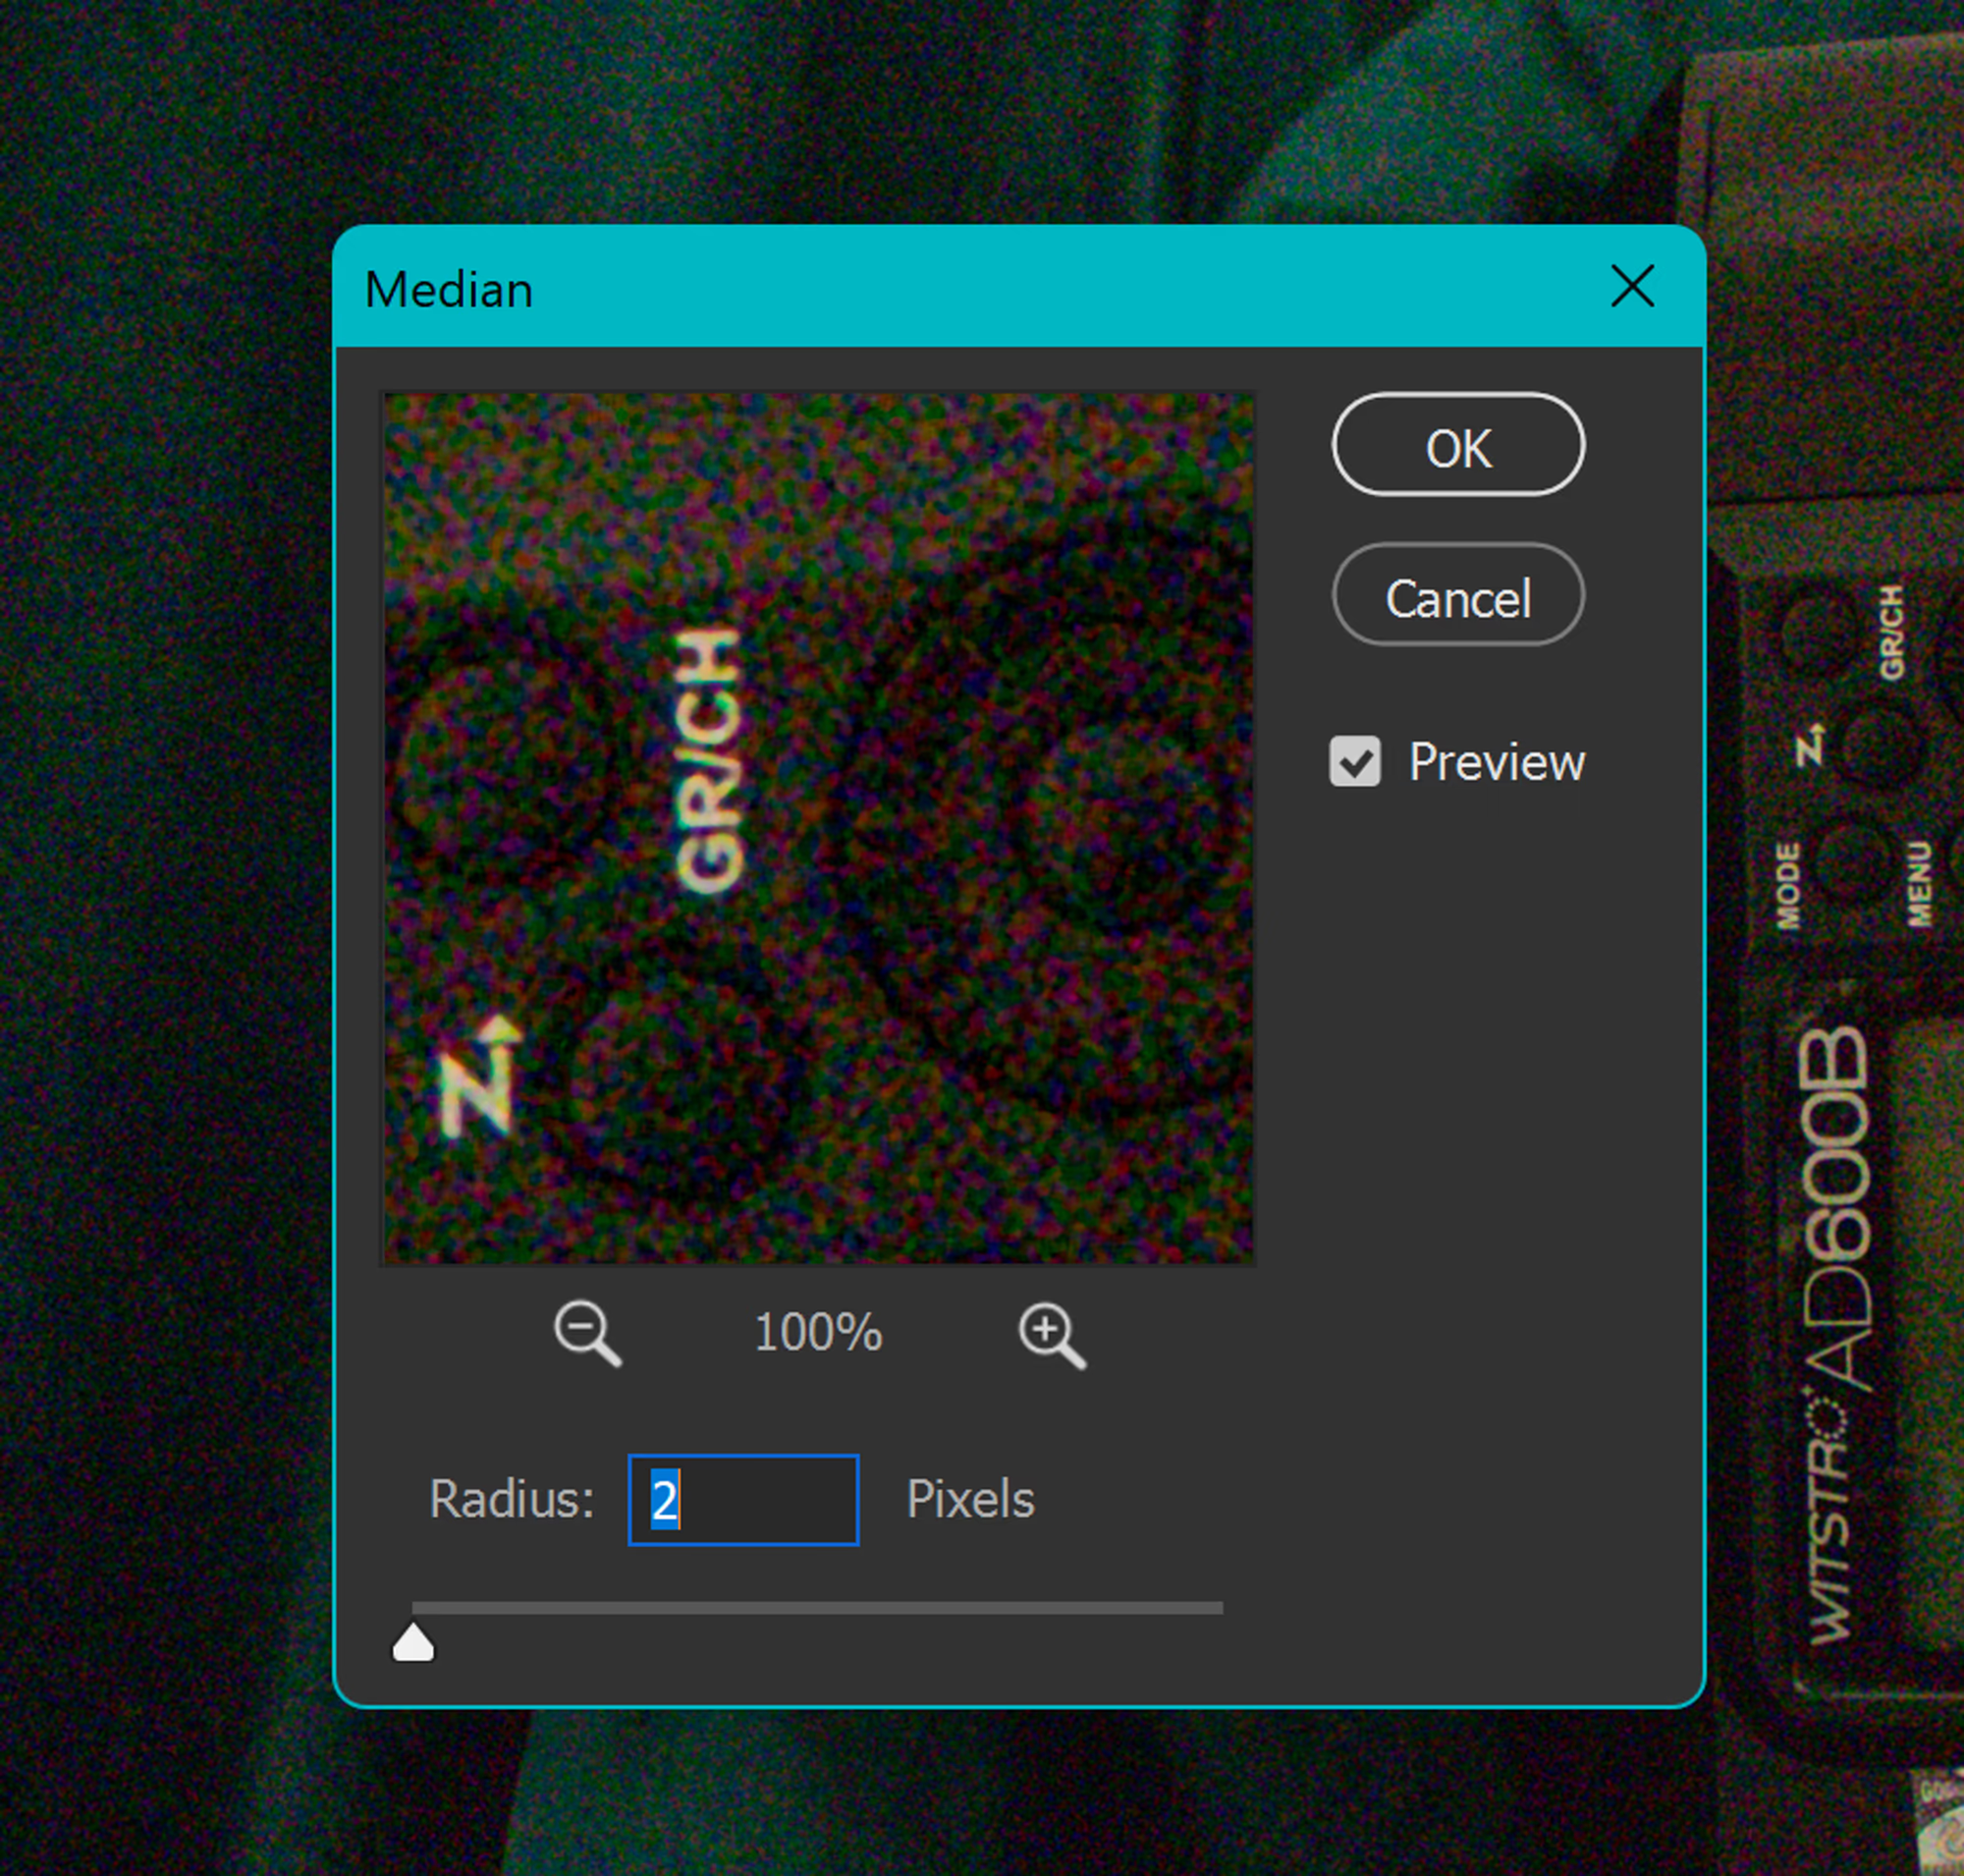
- So first apply a Median Filter (Filter > Noise > Median) of Radius 2 Pixels on your Smart Object. Now you will see the noise in Shadows will be significantly reduced and they will now appear Black instead of Magenta or Red. This
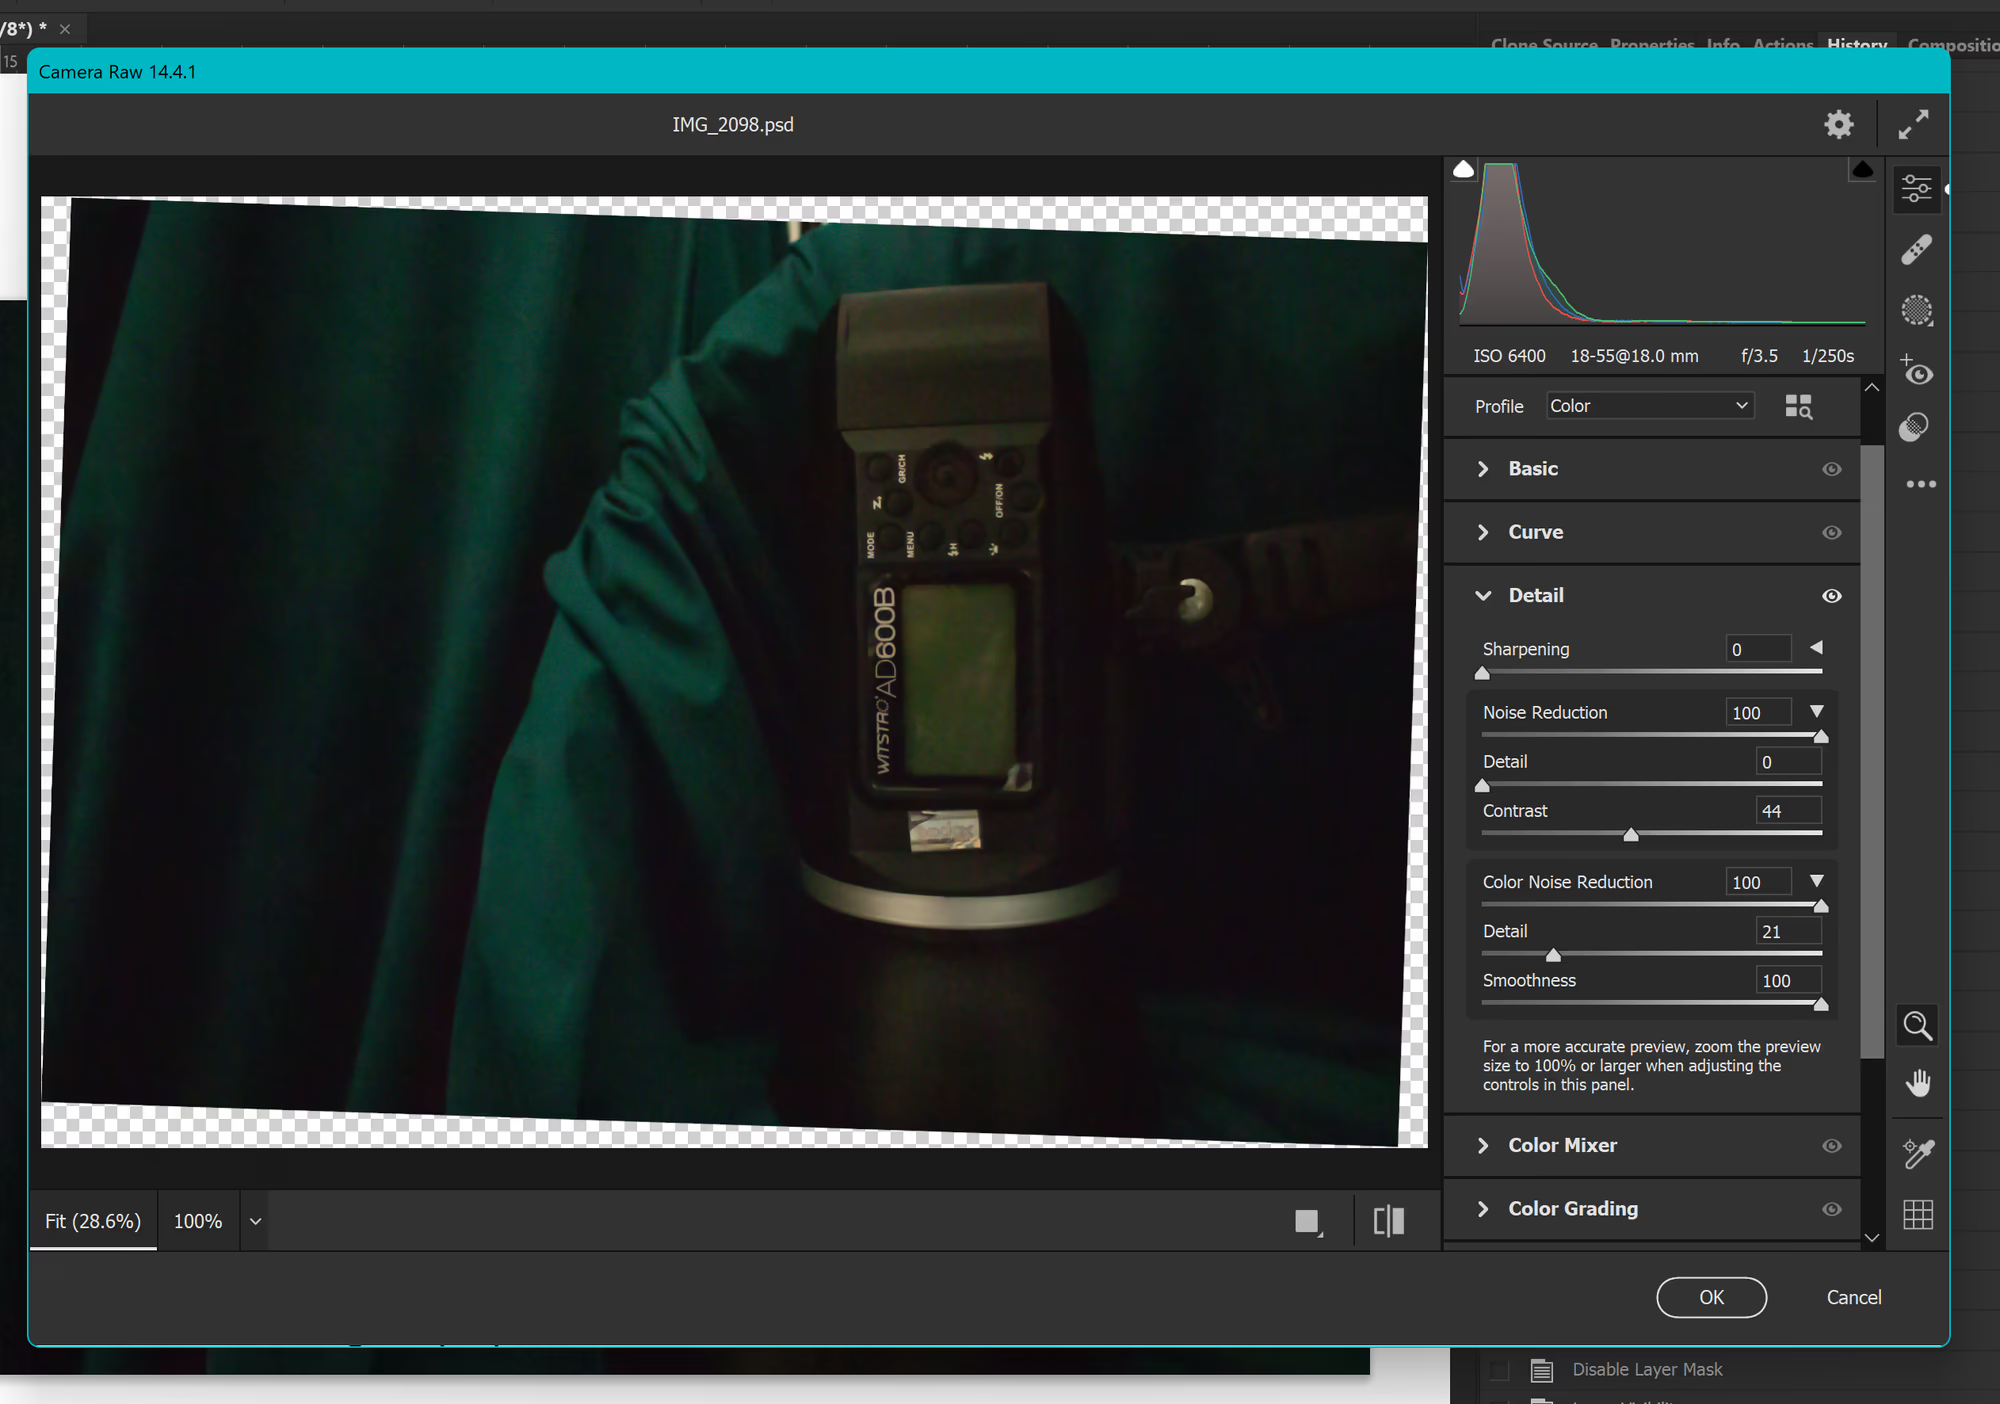
- Next, we will add a Camera Raw Filter to this Smart Object. In the Camera Raw Filter goto Details Section and there we have three Options Sharpening, Noise Reduction and Colour Noise
- Set Noise Reduction and Colour Noise to the maximum. Expand them by clicking the triangle on their right. Now we will see more options. Now remove all the detail from the Noise Reduction Menu and average the contrast.
- Depending upon the Image you can also add a Noise Reduction Filter to tackle your Image and Adjust the Noise by Controlling its strength and Colour Noise Slider
- Colour Noise reduce the number of Details and Increase smoothness. We will use this image as the base for our luma mask.
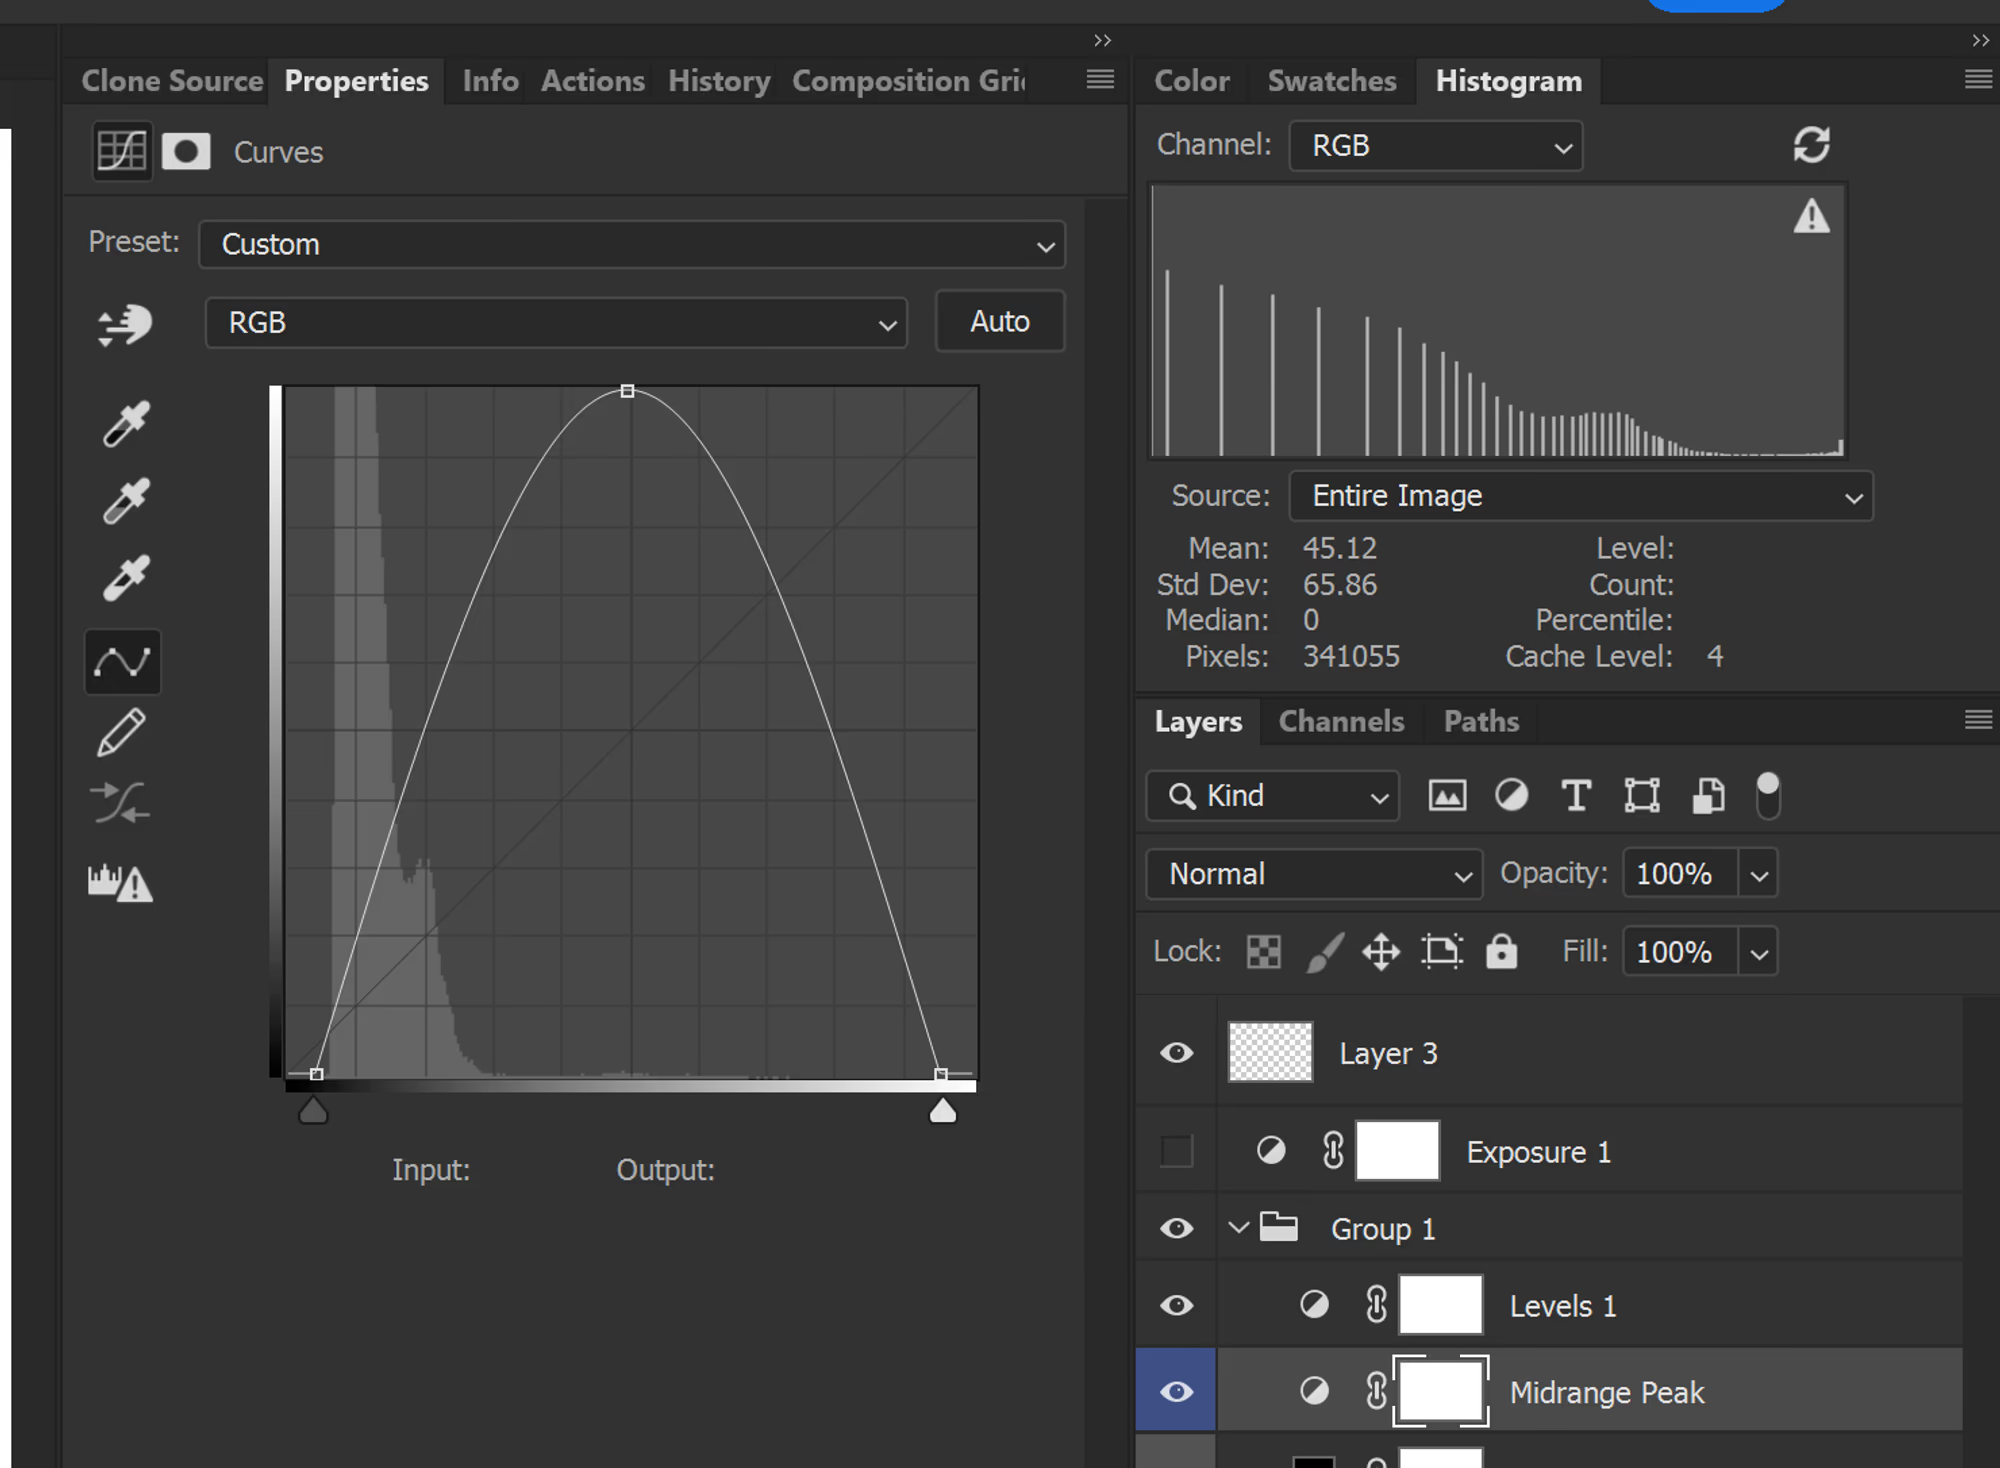
- First Create a Solid Colour Layer and Fill it with Black and set its Blend Mode to Colour, then make a mid-range peak using a Curves Adjustment and draw the shape of an Inverted V in it.
- Next, make Levels Adjustments to Knockout Shadows Group these layers and call it Mask.
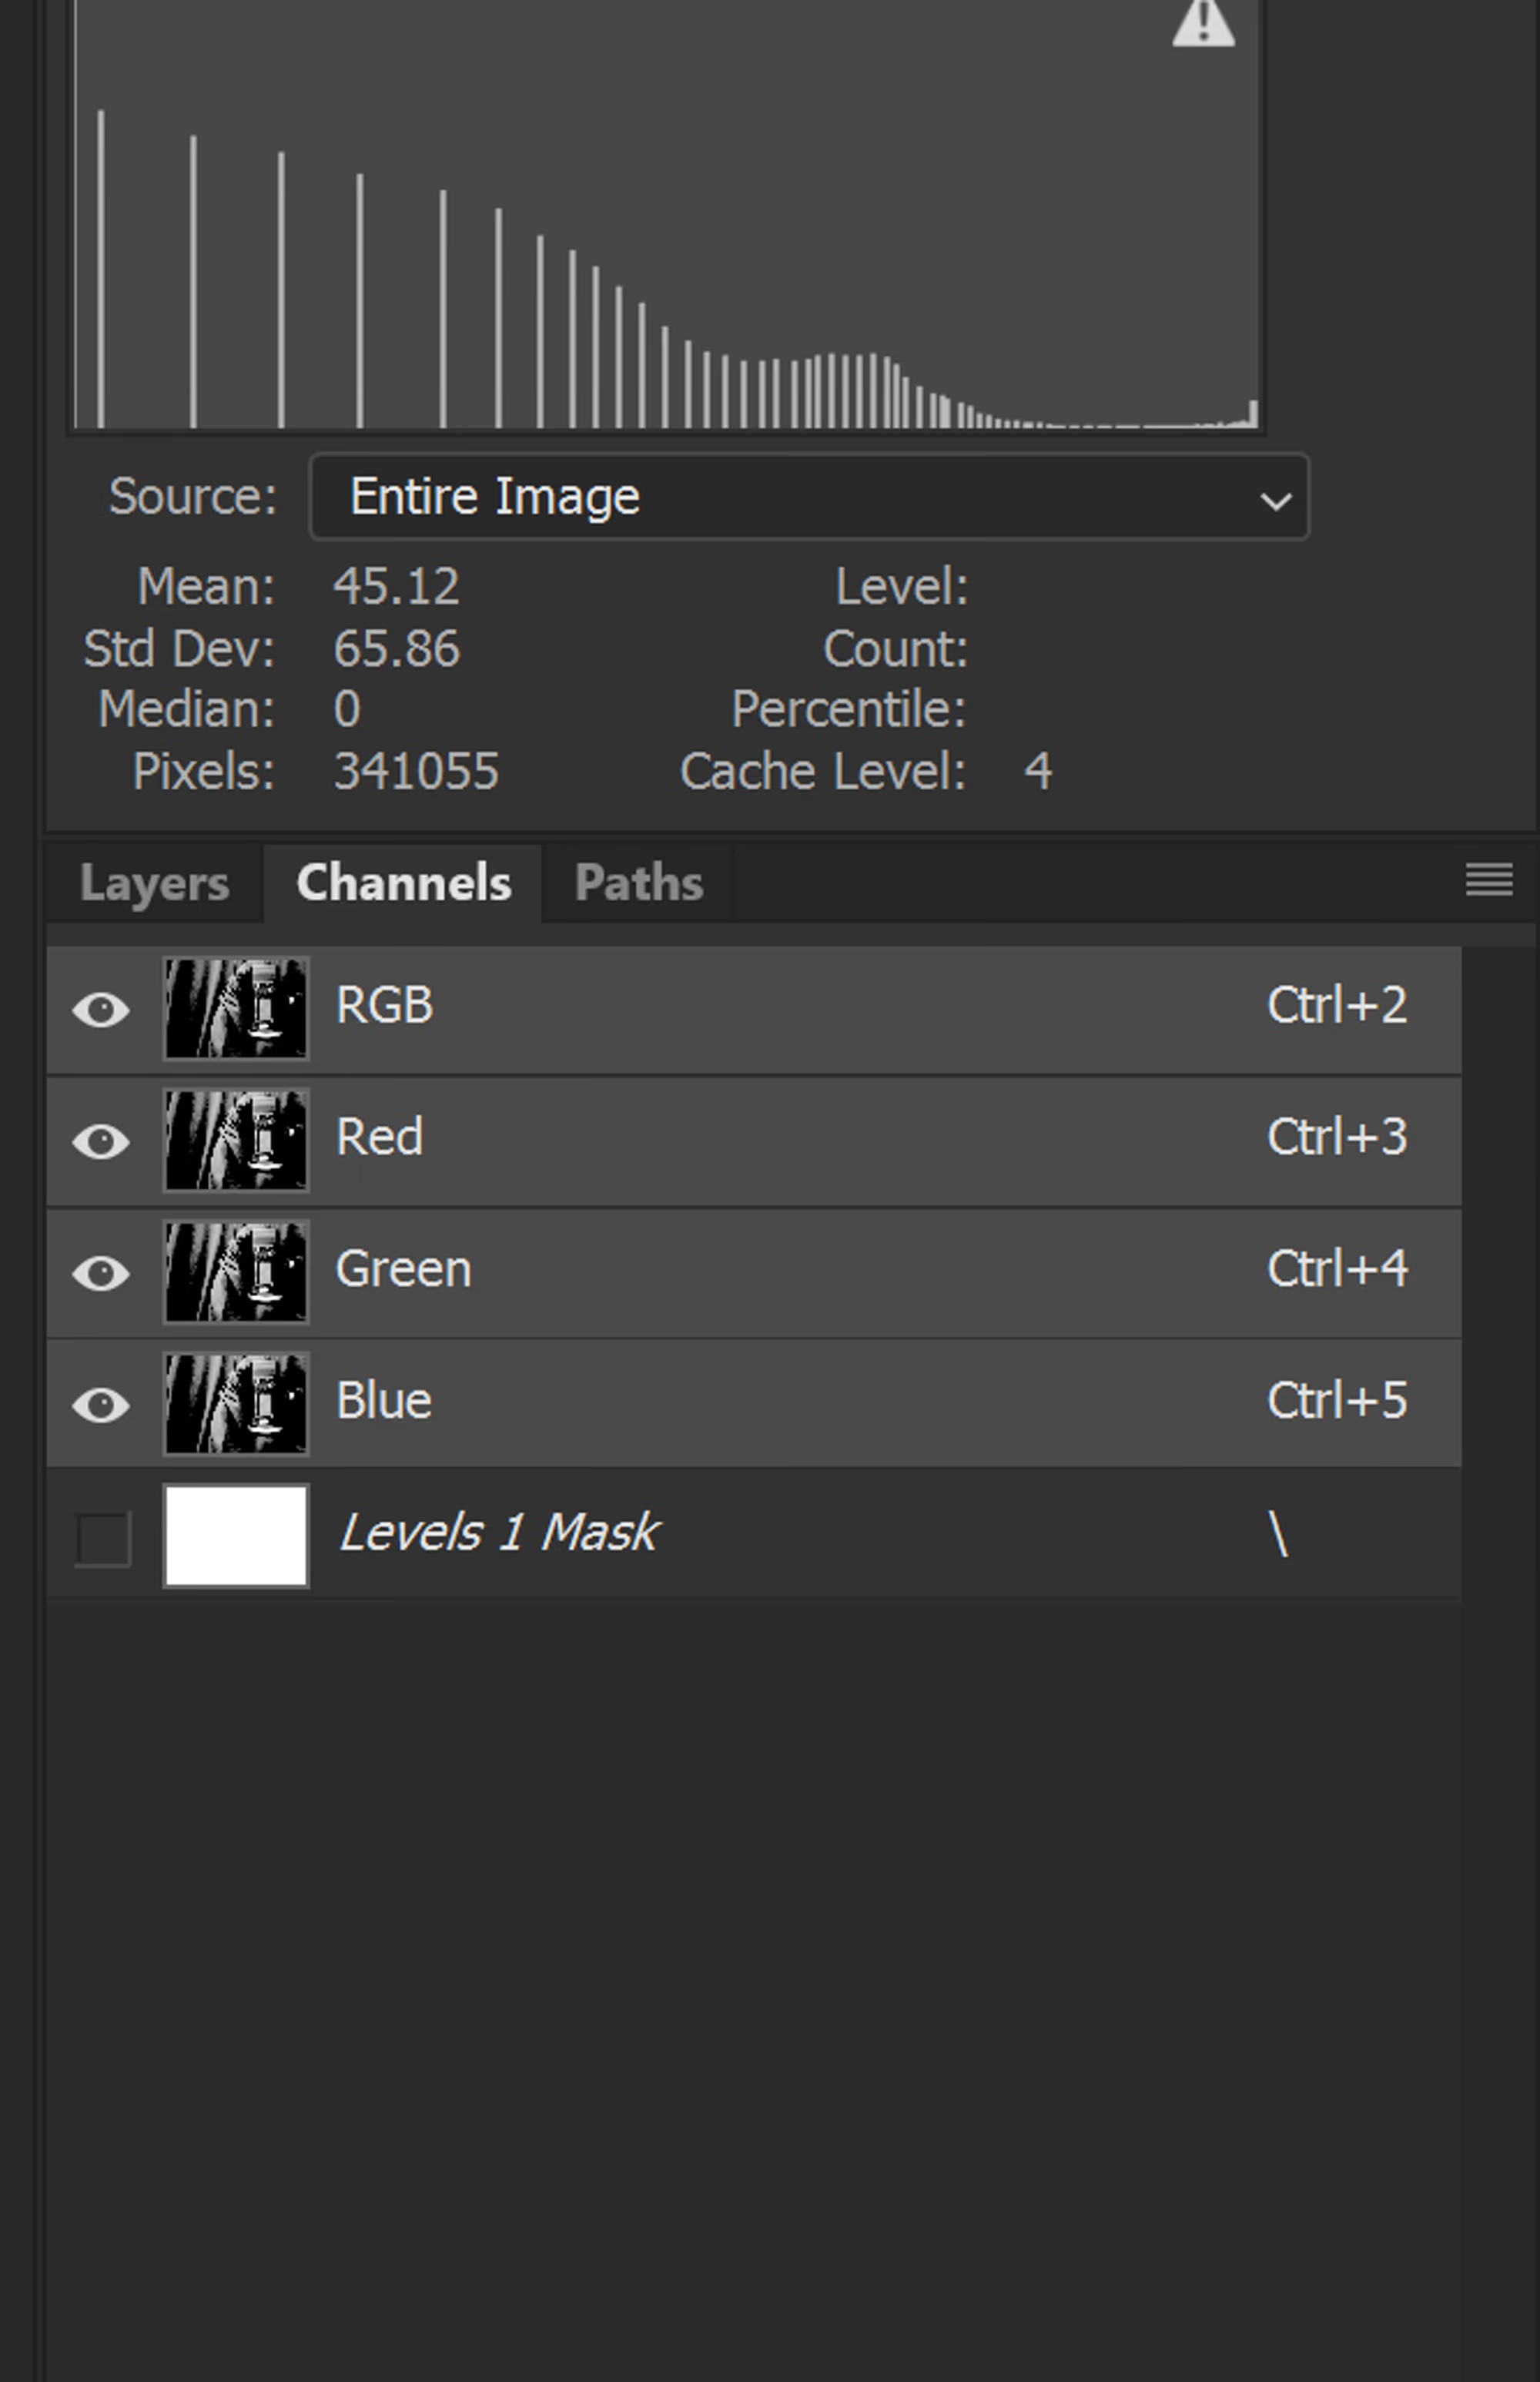
- Now make a Duplicate of your Smart Object and rename it as Details. Then go to Channels Tab to make a selection by clicking on the thumbnail with Ctrl or Cmd button pressed.
- Use this selection to make a mask on Duplicate Smart Object and Turn off the Median Effect from it.
Now we have added the Details and the Right Colour to the image while reducing the noise in Photoshop. This is something that Lightroom cannot do.
Photography is an art which is enabled by science and tech. Using it in the right way gives you the power to create masterpieces in the field of Photographic Arts. Understanding the tech behind the complex engineering of the devices, only evolves the artists to become a better version of them and helps them connect to the process and inspiration to create something new every day.
Today in the age of technology, for an artist, understanding and staying updated with tech is important. This enables you to be quick, and fresh with your creations without compromising the artistic essence in the creations.